Brief Introduction to Acceptance Testing

Introduction
Let’s talk about the way we do things. We work on a project, finish the implementation of all the requirements, deploy the project to the client-server, and test that all is in place, and the job is done. We do not hear from the client again:
– unless something is not working anymore,
– or if the client wants some changes.
Depending on how much time passed since we last worked on that project, we might or might not remember all the features of that project. So, changing things could break some functionality.
This can happen also when we work on a large project, that takes several months to develop. We will not remember all the little details of the project, so, changing things could break some functionality.
When we work on a large project, when more teams are working together, and each developer is implementing a totally different feature, we have no way of knowing in what way our changes will affect the rest of the features, so, changing things could break some functionality.
As we also discussed in our previous meeting, we want to upgrade the theme or a plugin in our application, but even if we know what was changed, we do not know how these changes are affecting the application, because, changing things could break some functionality.
What could we do to avoid this? Let me tell you a bit about Acceptance Testing.
What is Acceptance Testing?
- Acceptance Testing is the functional testing of a
USER STORY. The USER STORY captures theWHO,WHATandWHYof a requirement, in a very simple and condensed way. - Acceptance Testing is the type of testing that is performed in order to certify that the application respects the requirements.
- Acceptance Testing is the method of confirming that the system behaves as predicted,
FROM THE USER’S PERSPECTIVE.
Why Use Acceptance Testing?
- Check that the functionality still works in different stages of the project or features development (regression testing prior to a production release)
- Check an expected result from the system (validate the user stories)
- Check that what is implemented is what the client requested
- Check if the client/users have problems using various features of the project
- Check if the application behaves as anticipated
The Acceptance Testing Process
- Analysis the requirements
- Create a plan
- Identify the scenarios
- Create the cases
- Prepare the test data (production-like data)
- Run the tests
- Record the testing results
- Confirm the objectives
Because we develop complex web applications, we need to use a testing framework. A testing framework will allow us to test all links, pages, forms, elements interactions, and anything else in just minutes, using automated test scripts.
What Testing Framework to Use?
We are already familiar with PHP, so we could use Codeception, this testing framework allows us to write our tests in PHP. Also, Codeception can naturalize the scenarios we create, converting these into plain English. This makes it so that also non-technical people can read and understand the tests.
Brief on Codeception Testing Framework
Codeception allows us to write our tests in PHP, and the locators are stable: we can use: names, labels, and CSS to match the elements in our tests.
Codeception modules integrate with all popular PHP frameworks, but these work for any website, even if you use a custom CMS or framework. Codeception keeps the tests in one place, structured, readable, and very easy to use.
All Codeception tests are written in a descriptive manner:
- Unit tests,
- Functional tests,
- Integration tests,
- Acceptance tests.
The syntax is simple and just by looking at the test code, we can have a clear idea of what the test is doing.
Install Codeception and Selenium Module
- Go to http://codeception.com/
- Follow the instructions to install Codeception
- Install the Selenium module
- Enable/disable and re-configure modules for your needs
The First Acceptance Test
- Create the file TestCept.php in tests/acceptance/ folder (to make a PHP file a valid scenario, its name should have a Cept suffix)
- The body of the test
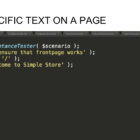
<?php
$I = new AcceptanceTester( $scenario );
$I->wantTo( 'ensure that frontpage works' );
$I->amOnPage( '/' );
$I->see( 'Welcome to Test Site' );
?>- Run the test in your terminal
php codecept.phar run tests/acceptance/TestCept.phpSome Examples
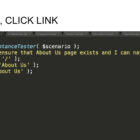
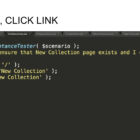
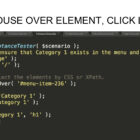
I will show you some examples of how I use different locators in my tests
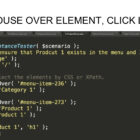
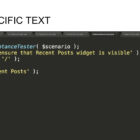

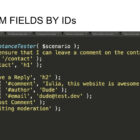
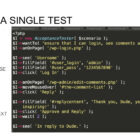
How Does It Look Like?
Resources
- www.codeception.com
- Writing Acceptance Tests, by Brian Richards
https://vimeo.com/113466213 - Impact Analysis Made Easy, by Chris Lema
https://www.youtube.com/watch?v=sBbbMhBt5-M
Photos from the WordPress Meetup Presentation


Photo credits: Cezar Cazan, Bogdan Dragomir, and Vladd.
The presentation is available at https://docs.google.com/presentation/d/1KR6omXbBQOQA274tEXGCnNC6BOrpP_EPcMEO2zDUkOM/